To use
the full potential of I-Tex you have to be able to operate with several
textures simultaneously. For this you make use of the "Source" feature.
It's the interface between each texture. Just press the ->Source
button in the window of the texture to set it as source. If you activate
this, not the target texture but the as source set texture will be used for
the required highmap creation.
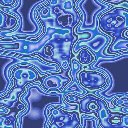
(1) The bump\shadow - ellipse
 |
Create a new texture and generate
with the generator engine a plasma (turbulence<20 and with the primary
color). After this draw an object (like here the "bump" wording) on the
texture. If you use a brighter color than the background plasma, this will
be interpreted as if the object is higher than the plasma. Now set this
texture as source. |
 |
Open a new texture with the same
size. Create a plasma on it, too (like here for example with a brown color). |
 |
Now activate the bump \ shadow
ellipse. Choose a light color like here for example orange. Now draw several
ellipses to any positions on the texture to make the source come out. The
pre-smoothing
here has the effect of creating edges around the wording. |
(2) Star Field
 |
By using some tricks you can create
nice star fields with I-Tex, like mentioned in the glossary. For this open
a new texture and choose star field at the generator engine. This
function creates random pixels having a different brightness. Now choose
white as primary color, also a post-smoothing of 0 and let the generator
engine use the primary color and not the color gradient. Play with the
initial multiply and iterations values until you have the
desired star field. |
 |
After this activate plasma \
blend \ full at fill and filter and choose a color for the background
nebula (optimally a dark color). Now click on the texture. If the created
nebula is not what you wanted just perform an undo, to cancel the
nebula, and play with the plasma turbulence value and the primary
color. |
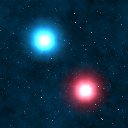 |
Now you can embellish your image
with some large and bright fixed stars. For this the special \ gentle
blend ellipse is recommended. Choose a color for a star and draw several
ellipses (or circles by pressing shift) having the same center and
a different radius.
After this choose a white color
and add smaller circles at the star's center. |
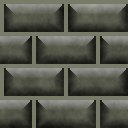
(3) A bit of edge trace
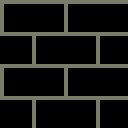 |
Create a new texture and choose
a primary color. Then activate the bricks function at the generator
engine. Be sure that the primary color is used for the pattern generation.
The y-tile factor should be twice as high than the x-tile
factor to make the stones be twice as high than wide. A post-smoothing
of 0 is very recommended. |
 |
Now open another new texture with
the same size and create a plasma, also with the generator engine and the
same settings. Set this texture as source. |
 |
Switch back to the first texture
and choose the edge trace \ light at fill and filter.
Set up a suitable edge size (like here 10 for example) and activate
use
source as texture. Now click on the black stones. |
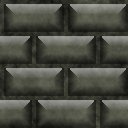 |
To get rid of the single colored
space between the stones you can use the flood fill \ texture \ source
function. You can fill the areas between the stones with the source using
this function. |
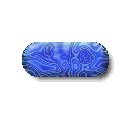
(4) Create a button using edge trace
|